Showing posts with label International Recipes. Show all posts

Tuesday, February 11, 2014

Hubby's Thai Green Curry with a twist

Recently a good friend of ours, spouse in tow, dropped in unexpectedly and stayed on for dinner. We caught up over a lot of things and the time just slipped by. It was when the clock turned a little over 7 PM did I realize that we had not yet decided about dinner. While we dilly-dallied as to where we could head over, my gallant hubby volunteered to dish out something funky. Of-course I had to be his sous-chef; the 'chef' had to have his mise-en-place and I scurried around getting things up and running. My kitchen slowly started singing to the lilting Thai tunes with a twist. 


The guests hummed a satiated melody and went back home singing paeans about my hubby's skills. I preened and trilled as if my very own limited (ahem) culinary prowess had been accorded heavy appreciation :D


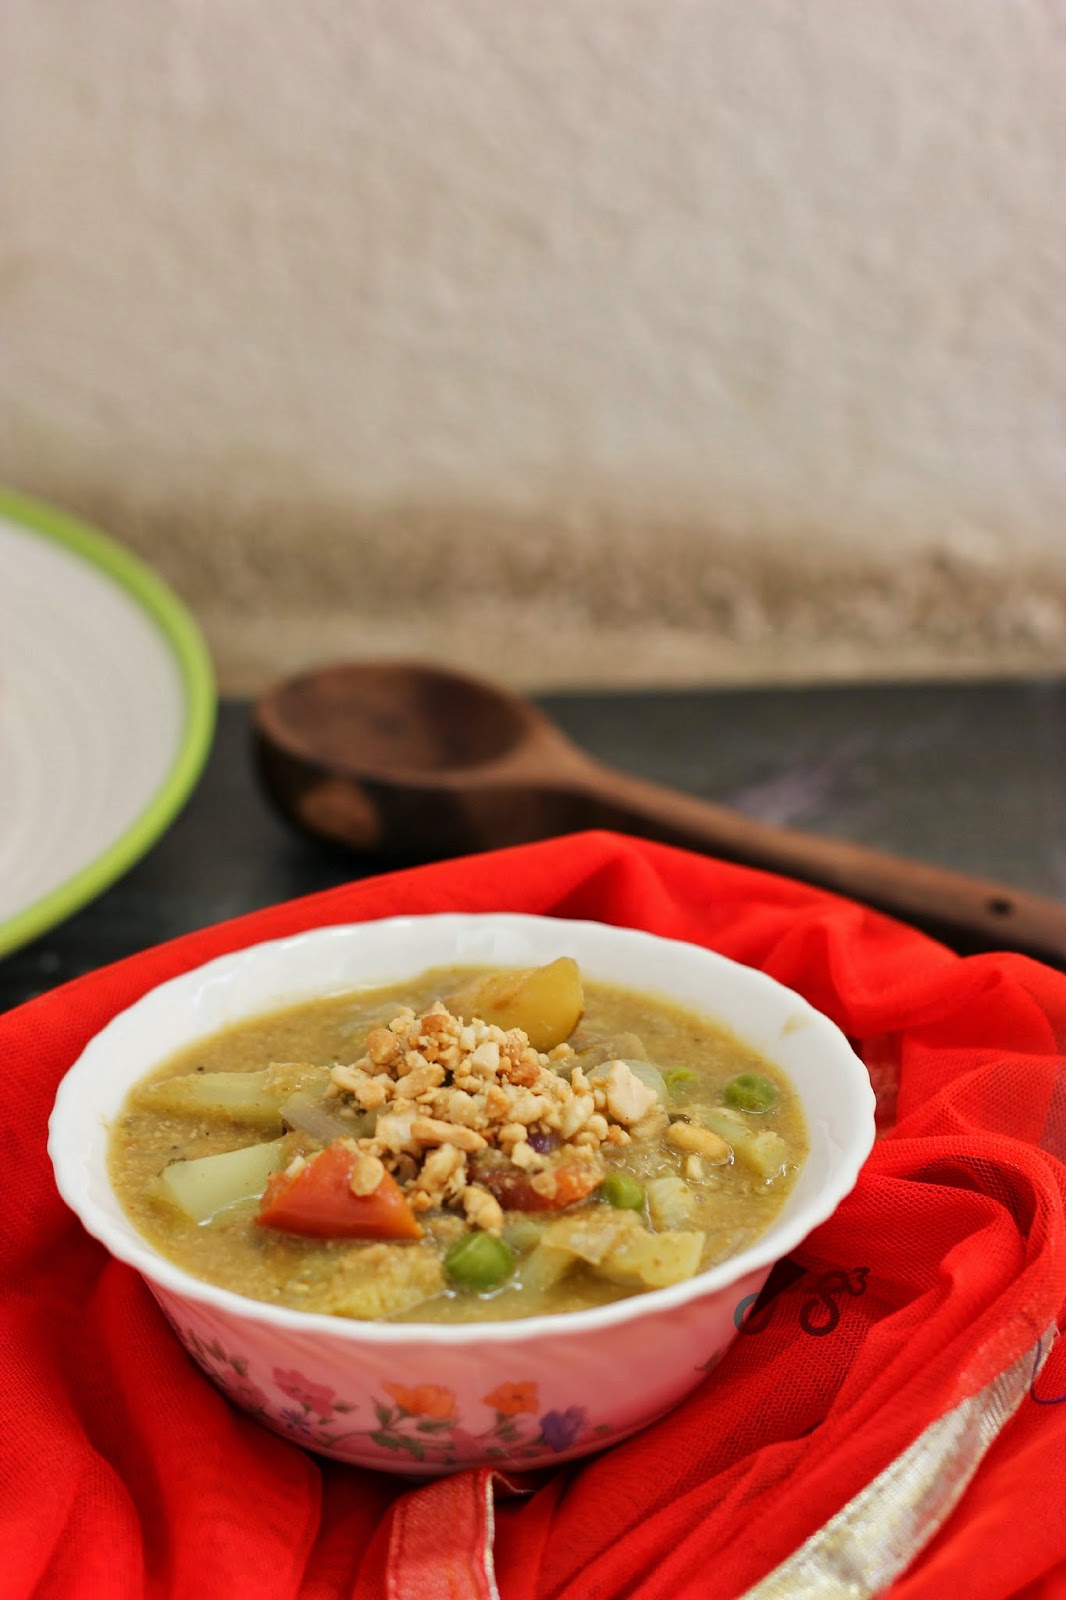
The veggies and fruits in the fridge found a place in the dish and added the zing!


The pics I have clicked does no justice to how it tasted. I served the gravy/curry with Garlicky Brown Rice, which btw was my humble effort. And no, there were no great praises heaved on the rice but then it was collectively agreed that the combo was a smashing hit :). I will put up the recipe for the rice some time soon!

{Serves: 4, Prep Time: 20 mins, Cooking Time: 15 mins}

What's in it :- 
  • Olive Oil - 2 to 3 tbsp
  • Dried Fenugreek Leaves - 1 tsp
  • Black Cumin Seeds (shahi jeera) - 1 tsp
  • Cumin Seeds - 1 tsp
  • Fennel Seeds - 1 tsp
  • Roasted peanuts - 1 medium cup (roughly crushed)
  • Milk - 1 1/2  cups
  • Water - 1 cup
  • Tomato - 1 large (cubed)
  • Green Peas - a fistful
  • Brinjal - 1 large (cubed)
  • Cauliflower - small (small florets)
  • Onion - 1 large (cubed)
  • Green Curry Paste - 2 to 3 tbsp {I used store bought}
  • Apple - 1 medium (cubed)
  • Orange - 1 medium (peeled and cubed)
  • Sweet Lime - medium (peeled and cubed)
  • Salt - to taste
  • Sugar - a pinch


Here's How:-

In a kadai, add oil and as it warms up, add the dried fenugreek leaves, cumin, shahi jeera and fennel seeds. Once they crackle, add the milk and water and bring it to a boil. Dunk the cubed onions, cauliflower, green peas, brinjal and tomatoes. Let the vegetables cook. Then add the green curry paste and let the whole mix simmer for a while. Add sugar and salt to taste and finally dunk the fruits. Let it simmer till it thickens and then take it off flame. Now add the crushed peanuts and mix well. Serve hot with Garlicky brown rice.


E.N.J.O.Y

Monday, September 30, 2013

Gnocchi in a Red Wine & Scotch Sauce - A "Spirited" Fare

Spirited Cooking! Gee, Cheeky as it sounds - this pasta was a finger-licking proof of a spirited fare on the platter. There is something about adding alcohol into cooking - it elevates the feel of the dish to another level and the flavor and aroma it gives, gets your taste buds tingling. It goes without saying that the content of alcohol in the final output depends upon the type of spirit used, how much of the liquid was plopped, how long was it cooked, what method of cooking was employed etc. In this pasta dish 2 shot glasses of red wine and a shot glass of whiskey was plopped for making the sauce. The dish did not scream the use of these tipsy liquids but the taste was a total knock out!  


Yes, I am back with another Pasta dish. It is surprising how the varied forms of dried pasta has woven magic in to my household. Not a fortnight goes when at least one pasta dish makes an appearance on the table. This week the small dumpling like pasta made of durum wheat was the collective choice.


Before I go on and on about how this dish tasted let me tell you that the dish though originally my brain child was seen to its perfect execution by hubby dearest. What actually happened was, Sreeram got excited about the inclusion of the booze and decided to don the apron himself. Well, who am I to complain! But let me remind you once again that it was me who thought of the long forgotten whiskey & red wine bottles :D That brings me to the star of the dishes - half finished bottles of red wine and scotch whiskey was vying for attention and bingo the pasta dish was gonna be their spot in the sunshine!


Pasta all glammed up never looked and tasted this Uber-Cool !


  • Gnocchi - 300 grams
  • Olive Oil - 3 tbsp
  • Shallots - 100 gms
  • Green Pepper - 1 (diced)
  • Garlic - 6 to 7 big pods (thinly sliced)
  • Oregano - 3 to 4 tbsp
  • Thyme - 1 to 2 tbsp
  • Tomato - 400 grams
  • Red Wine - 120 ml
  • Whiskey - 60 ml
  • Milk - 100 ml
  • Black & Green Olives - 50 gms each (deseeded)
  • Dried Basil - 1 to 2 tbsp
  • Chilly Flakes -  2 to 3 tbsp (to taste)
  • Mozarella Cheese - 200 grams
  • Salt and pepper to taste


Here's How:-

The pasta of my choice was Gnocchi. Cook the pasta as per the instructions on the pan. Well to quickly sum it up boil enough water in a wide pan to cover the pasta . Add some salt and some olive oil as it boils up and tip in the dried pasta. Stir it every once in a while to give it enough space for getting cooked. And just cook it al-dente. The pasta will offer little resistance when poked in to it. At this point take it off flame and drain the pasta. Refresh it in cold water and apply a little olive oil evenly to ensure that it does not stick to each other. You can retain a little of the starch water to add to the sauce later. 


In a thick bottomed pan, add the oil and as it warms up tip in the shallots, green pepper and the garlic. Saute it for a few minutes . Add the spice mix of oregano, thyme, chilly flakes and basil. Retain some of the oregano and chilly flakes to add finally. Add salt and pepper to taste. Once the raw smell goes away add the diced tomatoes and saute it for a few minutes till they are evenly cooked. Add the red wine and whiskey and let it simmer for a few minutes till the rawness goes away and the sauce is well cooked. Now add the milk and half of the cheese and cook for some time till the sauce is thick. Finally add the cooked pasta, remaining cheese, olives and give it a good toss. Now add the remaining oregano and chilly flakes and serve hot.


E.N.J.O.Y !

Wednesday, January 2, 2013

Farfalle with creamy corn, pepper & tomatoes and Happy 2013

Wishing  you all a Rocking 2013. Hope the year is blessed and bestows all happiness & prosperity. 

What is life without hope ? The recent brutal carnage of the 23 year old has left an indelible sorrow,anguish and angst in all of us. In her death, she has awakened us. Hopefully, we channel all those energies in to shaping our system in such a way that it puts a morbid fear of law to the would be perpetrators. Besides its time we shed our lethargy & negativity, boot out insensitivity and embark on a spirited self. Rather than poke & point fingers and blame the system, we become the change and get proactive. In this context, I salute the indomitable spirit of the women of India. She faces obstacles at every step,  survives the jeers & catcalls as well as the sexist remarks. All talks of gender equality bite the dust amidst the taunts for the way she dresses and talks.  She is bracketed & stereotyped. Many a times, her very existence is questioned and she falters & stumbles. Yet she rises like a phoenix and faces the world boldly. Her hope to make the world a better place gets a thumping resolve every minute she is written off. She braves the odds and embraces life. Here's me doffing an imaginary hat to us ladies. WE ROCK !

The first day of 2013 blossomed amidst all these positive thoughts for me. The hearth buzzed with my daughter's favourite. This pasta dish got repeated yet again yesterday and why not ? It is simple to make and hugely filling. Besides it is a sure kid pleaser !


Rustling a lunch or dinner by spending little time in the kitchen is something I dote on. And if the dish is delicious and creamy with staple pantry ingredients and spells P.A.S.T.A then it has a stamp of approval from the kids too ! Go on and indulge in this creamy and blissful dish :)


What's in it :- (Prep time ; 15 mins, Cooking time : 10 mins, Serves :4)


  • Farfalle (Bowties) – 2 cups of dried butterfly shaped pasta
  • Olive Oil – 3 to 4 tbsp
  • Garlic – 5 large pods (chopped)
  • Green pepper (small) – 1 diced in to small cubes
  • Tomatoes (small) – 2 (cubed)
  • Sweet Corn (cooked) – 1/2 cup
  • Capers – a fistful
  • Italian Seasoning – a very generous sprinkle ( about 1 1/2 to 2 tbsp)
  • Fresh Cream – about 1 to 1 1/2 cups (250 to 300 ml)
  • Salt & Pepper – to taste
  • Water – as required (retained from the cooked pasta)
  • Grated Cheese – as required


Here's How :-

Cook pasta as per instructions in the pack. Take care it is al dente (firm to the bite).
Heat the olive oil and add garlic. Saute it for a few seconds. Tip in the pepper and tomatoes and saute for a 2-3 minutes. Add the sweet corn,capers, the seasoning, cream, salt & pepper. Cook it for 5 minutes or a little less.

Add the starchy water retained while draining the cooked pasta (as required) if the mix becomes too thick. Dunk the farfalle and cook for a minute or two until the pasta is totally coated with the sauce. Remove from flame and generously grate the cheese all over.

Serve hot & enjoy.


Chef Notes :-
  • You can add veggies of your choice like asparagus, broccoli.
  • Be sure to retain some water from the cooked pasta. This starchy liquid will add to the texture of the dish and lighten if the creamy mix becomes too thick.

Linking this to Nancy's YBR FEB


Tuesday, December 25, 2012

Potato & Cabbage Casserole and Merry Christmas Wishes

The season of cheer and merriment is here. Christmas signifies the birth of hope and good tidings. I wish all the readers a very merry christmas

Hope the year ahead bestows you with all blessings, fills you up with love & sunshine and heralds a new beginning !

(Source:Net)

Besides drenching in the holiday mood the day is dotted with binging on all things dear.


Cheesy, golden crusty,and full of veggies-doesn't that sound wonderful ? It is a creamy surprise every bite !


My daughter loves cheesy potato casserole and when I spotted a recipe with cabbages and carrots in the cheesy dish, I decided to make the same for a good afternoon lunch. The recipe is from the book Simply Vegetarian and is a gift from Valarmathi in her recent giveaway. This is a perfect Christmassy festive Menu and a sure kid pleaser :)


Here's How:-

Cook the potato  and mash until smooth. I pressure cooked the same. Alternately you can cook it in a deep bottomed dish until softened. Beat with milk and half the butter. Season it with salt & pepper.  Mash again

Boil water with little salt in 2 different bowls and cook the cabbage and carrots separately. Drain well. Combine the cabbage with potatoes and let it become a smoothy mash. Melt the remaining butter and cook onion over medium heat until softened. It need not brown. Preheat the oven to 375 F /190 C  and grease a shallow ovenproof dish.

Spread a layer of mashed potato-cabbage mix in the bottom. Layer onion on it and top it with carrot. Repeat the layering and finish it off with a layer of potatoes.Generously grate cheddar cheese on top.Bake for 45 minutes or till the top is golden and crusty.


Remove and serve hot - E.N.J.O.Y

Sunday, December 9, 2012

Pita Bread Sandwich with Charred Pepper Hummus - A heavenly combo

What do you do when the 'I do not want to cook' bug bites ?  Ahem, lately this bug has been harassing me steadily. The good news is that it gets booted out with fun assembling of sandwiches. Quick, easy and filling. Mostly with breads, and sometimes with left over rotis or parathas and generally simple and fuss free. I am sure you would all agree when I say that there's nothing like a hearty mouthful of a good sandwich. 


'You don't need a pack of wild horses to learn how to make a sandwich' - Phil McGraw 


It's no rocket science to assemble a sandwich !  Take a bread, spread some dip, top it with this and that, pack it with another bread & voila it is ready to be devoured. As a rule, you can not go wrong with a sandwich but an innate sense of the flavours adds to the punch. 

Last week I decided to flex my 'yeast' muscles and made Pita Bread. This staple middle eastern bread is a great confidence booster. When you have had some really bad baking days, try making this pocket breads. You will not go wrong. They come out all puffed up and swelling in pride. And together with hummus, they are indeed a made for each other combo. Hummus, the chickpea delight is a staple in my home and often used as a spread for the rotis. 

Did I tell you that pita & hummus are fertile grounds for innumerable ideas on doling out sandwiches ??? Good for me as the Sandwiches theme for this month's Avant Garde Cookies was a joy to dish out !


For the Pita Bread :-(Makes :12 Pitas)
(Prep Time: 30 mins, Rising Time: 45 mins, Cooking Time: 3 to 6 mins)
Puffed Pita breads are a pleasure to behold ! When the dough swells royally, the bread reciprocates equally!
  • Active Dry Yeast - 4 grams (1/2 tbsp app) + Water (app) 50 ml to proof it
  • Sugar - 1/2 tbsp
  • Water - 200 to 250 ml warm water (or as required) {for kneading the dough}
  • Whole Wheat Flour - 250 grams
  • All Purpose flour - 150 grams
  • salt - 1/2 tsp
  • Olive Oil - 1 tbsp


Here's How :-


A good pita means a well proofed yeast. Dissolve the yeast and the sugar in 50 ml (approx) warm water. The yeast will slowly become a semi-pasty texture. Cover the bowl and set aside for 10-15 minutes. The yeast will turn all foamy and will be ready to use.

In a mixing bowl, tip in the flours and salt. Make a well in the center and add the yeast mixture. Mix well and add the warm water little by little while continuously kneading. Take care to pour water as required only. Knead for a few minutes. Tip in the olive oil and knead some more till the oil is absorbed.

Cover the vessel with a cling wrap/ or a wet kitchen cloth and set aside in a warm area. Let it double up; it approximately takes 45 minutes.

Knock down the dough and knead again for a few more minutes.

In the mean while preheat the oven to 175 C/350 F. Divide the dough in to equal sized balls. In a dusted surface roll out the ball in to a round disc.

Bake each side for 2-3 minutes, carefully flipping it for the other side to brown up.

If the power plays a spoil sport or you don't have an OTG, you can still make a swell pita on gas stove.

Roll out the dough in to a disc and place it on a hot tawa/pan. Let it cook on both sides for a few seconds till brown spots starts appearing. Pick the rolled thin with a tong and place it direct on the high gas flame. Watch it swell immediately and flip it over. Take off flame without over burning the disc


For the Charred Green pepper Hummus :-

  • Green Pepper - 1 large
  • Sesame Seeds - 3 tbsp
  • Chickpeas - 300 grams (soaked & pressure cooked/ if using canned, drained)
  • Garlic - 5 pods
  • Cumin Seeds - a good pinch
  • Lemon - juice from 1 big lemon
  • Salt & Pepper powder - to taste
  • Olive Oil - 4 to 5 tbsp
  • Cold water - as required 

Oil the pepper well and thread it to a skewer, char it on a gas stove . Let it cool and dice it in to chunks. In the meanwhile dry roast the sesame seeds to a golden brown and let it cool. Tip in the diced pepper chunks,sesame seeds and all the other ingredients in to a processor and pulse until well blended adding cold water as required.The paste should be of a spreadable/dip consistency.

Assembling the sandwiches.

“Life is like a sandwich - the more you add to it, the better it becomes.” (Source: Net)

It is the most fun task of all. What I do is make all the breads and keep the various accompaniments ready. Then we sit down and make a sandwich tailored to each one's needs.

  • Charred Pepper Hummus
  • Onion
  • Tomato
  • Green /Red/yellow Pepper
  • Black * Green Olives
  • Grated Cottage Cheese
  • Red Tabasco Sauce
  • Minty Yogurt sauce (Beat yogurt,salt,pepper,finely chopped mint leaves, red chilli powder, a little apple cider vinegar and refrigerate)
  • Honey & Mustard Salad Dressing (store bought)
Spread the hummus on a pita bread and top it with choice ingredients. Tip in the grated cottage cheese and finally drizzle the minty yogurt sauce or the store bought honey & mustard salad dressing. Finally sprinkle the red Tabasco sauce. Place another pita bread on top. Cut in to quarters and enjoy :)

E.N.J.O.Y

Sunday, November 25, 2012

Turkish Red Lentil Soup with Dried Apricots - Very Vegan, Very Yummy

The other day my sister-in-law observed that my blog was lacking soup recipes. That got me thinking. Yup, there are indeed no recipes to soup my space up. I thought about the reasons and comforted myself that:
  • I am no soup person. Even when we go out for dinner I seldom ask for soup; rather I impress upon the waiter that I have not eaten for eons and threaten him to bring the starter and main together and asap!
  • Soup is for the 'cold' and for the 'not feeling well' times. And if somebody (read hubby)  is making a soup for me I would not overstay my welcome by demanding him to put them in nice looking bowls and take dainty pictures !
  • What are Maggi & Knorr ready to make soups for ? Yeah, I know the taste is artificial, but ain't the packets in the aisles exactly for that? To make in a jiffy...
  • Besides isn't rasam a soup ? Mulligatawny Soup is nothing but our quintessential milagu rasam. By that standard, my hearth boasts of a regular soup feature; never mind that we mix it with rice and eat :)
Cutting the long story short, I somehow found the real reason (drum-rolls ~!), I am lazy to make soups from scratch. So, I decided to to amend my indolence woes pretty soon. The opportunity came after Diwali. No, I/we did not fall sick. Rather, the over eating binging from the festivities meant that the tummy needed soothing food and this is where the soup came in to play. 


The soup a delightful combination of red lentils and dried apricots, is a delicate blend of sweet and savoury. The various spices blend in with fine results and creates a stimulating and racy dance on the taste buds :D


The Avant Garde Cookies theme for the week 3 of this month was turkish Cuisine and my best friend (read Google) came to my rescue. There were many recipes that I eyed but  this  soup caught my fancy. What was heartening was almost all the ingredients were in the pantry and there was no mad scurrying to assemble them.  I substituted paprika with red chilli flakes and parsley with coriander. Also apple cider vinegar got substituted for balsamic vinegar.


(Prep Time : 15 mins,Cooking Time :30 to 45 mins, Serves :4)


Here's How :-

I used a pressure pan for making the soup. Heat the oil over medium flame and add the onions and garlic. Saute until translucent. Add bay leaf, cinnamon, cloves, ginger, and cumin, and saute for 2-3 minutes.

Add lentils, water, coriander leaves and apricots. Cook up to 4 whistles and lower the flame for 5 minutes. Take off flame. 

Add the vinegar. Remove bay leaf and puree soup in batches in a blender. Season with salt and plenty of pepper.

Garnish with red chilli flakes and coriander leaves and serve hot with soup sticks or toasted bread. 


Verdict & Useful Pointers :-
Bags of flavours in this soup. A keeper recipe and yes I am a convert :)

1.
You can cook the soup in a thick bottomed vessel or a soup pot. Follow the same procedure and cook with a lid closed for 1 hour, or until the lentils are completely soft.
2.
If making the soup a little ahead of time, reheat it and serve hot with garnishes as required.
3.
I used whole spices for cloves & cumin and used a small ginger piece instead of ginger powder. If you have powdered spices for the same you can use it. Actually it does not matter, because you will be anyways pureeing the soup in the end.
4.
Adjust the spices to taste. 

Linking it to Divya's 60 days to christmas


E.N.J.O.Y

Friday, October 26, 2012

Say Hola to Churros

Minutes before boarding her school van, my daughter mouthed a strong request demand - mom, 'why don't we make churros this evening' ? Churros I mumbled ? ; Mexican she drawled ! I was flabbergasted - didn't know my little princess could name dishes outside her pizza and pasta world. I had only a few seconds before I spurted out how she knew churro and the ilk? She looked at me as if I was a Martian and said 'mom if kids my age or less can cook gorgeous dishes why can't I name a few' ? aah - that's all I could muster before she parted with a peck on my cheeks. 
There was a myriad emotions swirling in my mind ! My little angel is growing I reminded myself. Of course I was still stuck in a time warp when at her age all I recognised and digged ito was idlis , dosas  and some assorted tamil dishes. My first foray into Mexican food was back in college. While I was not gung-ho about the dish that got plated before me, my palette got a defenite whiff of the cuisine. However, what had me pining for the enchiladas and the quesadillas was the first romantic dinner my hubby took me out after marriage. It's another matter that all I can remember today was the dim lights of the restaurant (TGIF) , batting eyelids, loads of nervous laughter and a full tummy :D


There on, I was hooked to the cuisine. Once-in-a-while, I make quesadillas and salsas to go with the store bought nacho chips. If dining out in a multi-cuisine restaurant, my tummy shows its unadulterated love for the mex food :P 


So my daughter came home from school and together we set out to make this deep fried delights. Churros though originated in Spain became famous across continents including Mexico. The ridged texture of churros comes from the dough tipped in to the hot oil via a star shaped nozzle/tube Crispy outer and a soft inner, do I say more about this winsome beauties. As I had never attempted before, my prowling the net for a good recipe landed me here.  


Not to be outdone in flauting my knowledge (???) I muttered a 'Provecho" (read enjoy) while handing over the churros to my daughter and pat came the reply Gracias ! My kid is growing (happy sigh !) Did I say that already ????
Here's How :-

Heat oil (sunflower/vegetable/corn) in to a frying pan and let it simmer till the dough is ready to be piped in. In a separate dish mix the sugar and cinnamon for dusting the churros and set aside.

In a deep dished pan add the water, brown sugar, salt, and butter and heat to a good boil. Take off flame and slowly add the flour while continuously stirring the same. Mix until well blended.

Mix the eggs and vanilla together in a separate bowl and then add this mixture to the flour mixture. let the egg & vanilla combo completely blend in to the flour.


Tip in the dough to the piping bag fitted with a large star nozzle. Test the oil by tipping in a small amount of dough in it. The dough should bubble up right away, if not the oil is not hot enough.Once the oil is really hot squeeze some dough into the oil about 4 inches long. I used a greased knife to release the dough from the bag.


Depending on the size of the frying pan, you should be able to cook 6 or 7 churros at a time. Cook them about 1 minute and turn them over with a slotted spoon. Let it now cook for an extra minute or two. Once the churros get a lovely golden brown color take them off flame with the the slotted spoon and place them on a paper tissue to absorb excess grease.

While still warm, roll each churro into the dish with the sugar and cinnamon until coated. We digged in to it with a chocolate dipping sauce.


Useful Pointers :-

1.
Make sure the oil you use for frying is really really hot; else you may end up with soggy churros. And that's a no-no !
2.
The dough can be made sans egg too. Instead tip in a teaspoon of baking powder. Similarly, if butter makes you cry out loud, replace it with 3 to4 tbsp of olive oil. However, if you are indulging in them once-in-a-while, I would recommend to ditch the health quotient :P
3.
You can enjoy churros with assorted accompaniments like hot chocolate sauce and cinnamon sugar.
4.
This delightful fried sticks can be enjoyed as an afternoon snack or a dessert . How about digging in to them for a late brunch on a sunday morning. 

The theme for this month in AVC is Mexican. Check what these cookies are dishing out Anusha , PRiya MRadhika , JayanthiRoshni

Linking it to Divya's & Priya's 60 days to Christmas

PROVECHO !

Thursday, August 30, 2012

Love - thy name spells magic; Celebrating it with Coffee Kissed & Red Chilli Spiced Brownie

Hubby dearest took a bite of this brownie and commented " This tastes much like our marriage "- all spiced up and full of heat,slightly nutty with a hint of the bitter coffee but at the same time chewy, fudge y and chocolate y" He couldn't have put it better :)


I have been married to my better-half for the past 10 years and would safely say "To love and be loved is everything". Back in the college days, I was a huge fan of Mills & Boon. Lascivious tales of tall, dark, handsome guys not necessarily in horses causing much distress in the damsel's heart had my undivided attention. Many a times, I have imagined myself as the protagonist pining for the hunk (shhhh!). Yup, I loved such mushy stuff. Still do :D 
The fact of the matter is I have always been in love with love. Cliched but true ! Wooing, pining and yearning appealed to my mushy side and I was ready to fall in love. Fortunately or unfortunately my upbringing never conditioned me for love before marriage and I got married to a stranger, whom my parents had shortlisted after the necessary matching of horoscope (horror scope ?). I met him for the first time one sunday morning a good 10 years back and within a few hours got engaged to be married 2 months later. Too shy to speak I was content in sneaking  a few surreptitious glances. We bid goodbye after exchanging e-mail address. A few mails to each other decked in all its polite courtesies was the maximum our exchange went up to. Married within no time, I learnt that love is not the bed of roses that I used to imagine. Almost everything including language, food & upbringing was different and thus  started my adventures of the heart. There was nothing in common and we were as similar as chalk and cheese. The different upbringing gave its share of fission but also brought us together. Opposites attract they say and we revelled in our differences.Over time, I realised love is like a bottle of old wine. It gets better and better with the passing minute. 

I see many a successful love marriage and also witness the breaking up of arranged marriages. In this context Anne Taylor Fleming's quote "A long marriage is two people trying to dance a duet and two solos at the same time " holds true. Poetic isn't it ? 
It doesn't matter whether the marriage is an arranged one or is an union of love but what matters is falling in love and remaining in love and of course with the same person.And it ain't easy; you have got to work daily, every minute of it and till the last breath. Laugh often and laugh together, say "I love you" everyday and as often and mean it; appreciate the good, the bad and the ugly; enjoy the differences. It it is very easy to take the relationships for granted; staying in love makes sure we don't fall in to that trap and it brings with it a lot of commitment,understanding and trust. Love makes a marriage work, love rocks the marriage and love alone makes the ride of life worthwhile. These are my 2 cents on the Love Marriage ya Arranged Marriage a contest by IndiBlogger.


Coming back to the brownies which sparked my train of thoughts, the recipe from Baking Bites has been tweaked to suit my palate. I love the caffeine hit and hence added some instant coffee powder. Also, red chilli powder has been substituted instead of cayenne pepper powder. 


What's in it :-


  • Butter - 115 grams (1/2 cup)
  • Dark chocolate - 125 grams  - chopped ( I used Cadbury's Fruit N Nut) 
  • Cocoa powder - 2 tbsp
  • Sugar - 250 grams (1 cup)
  • Eggs - 2 large 
  • Vanilla extract - 1 tsp
  • All Purpose Flour - 85 grams (approx) (2/3 cup)
  • Cinnamon Powder - 1 tsp
  • Red Chilli Powder - 1/2 tsp (or a little less than it/to taste)
  • Salt - 1/4 tsp
  • Instant Coffee Powder - 1 to 1 1/4 tsp (I used Nescafe Instant)


Here's How :-

Preheat oven to 350F/ 176 C. Line a 9*9 baking pan/ or any other tin with aluminum foil and lightly grease.In a small pan, melt butter and chocolate together. Stir until very smooth. Tip in cocoa powder and mix until fully incorporated. Set aside to cool.

In a large bowl, whisk together sugar, eggs and vanilla extract. Whisking steadily, pour chocolate mixture into sugar mixture. Stir until smooth. Sift flour, cinnamon,  chili powder and salt into the bowl, add coffee powder and stir until just combined. 

Pour into prepared pan and spread into an even layer. Bake for about 35 minutes, until brownies set and a toothpick inserted comes clean.

Cool in the pan completely before slicing. I served them with a liberal helping of Red Wine Choco-Mint Sauce


Serve it as such or with whipped cream,or a scoop of ice cream. You can dress it with chocolate sauce and nuts too ! They hold good when stored in an air-tight container. Refrigerate them to retain freshness.


E.N.J.O.Y

Friday, August 17, 2012

AVOCADO & JALAPENO SANDWICH - A GUEST POST BY GAURI - BLOGGER OF THE MONTH

I am delighted to see that the series  Blogger of the Month has so many prolific bloggers adorning my humble space with their charm & verve. This month is no different. Gauri Trivedi graces my blog with her sassy presence. Her warmth and passion rubs on you and I am a big fan of her style of writing. An avid reader and a hobbyist writer, her zest for life is reflected in the heart-felt blog A day in the life of a MOM . Besides, her heart and hearth adventures are chronicled in Pasta and Paratha; the blog has recipes that are not only healthy but kids friendly too and is totally packed with flavor. 


Presenting Gauri 

-------------------------------------***************************************----------------------------
Ok, so I finally make it to the roll of honor on Priya’s Blog !! Month after month as Priya introduced her guest bloggers, I patiently waited my turn and I must say it came soon enough...

I remember growing up in a household where lunch was always a full meal, meaning roti, sabzi, dal and rice were the minimum items on the platter. Add some salad, an occasional raita, a pickle and a papad – that was what completed the meal. And in those hot summer days which lasted for half the year, a frothy glass of aromatic buttermilk awaited us after lunch. 

Fast forward to present day. The full platter lunch is now a weekend extravaganza. Two or three nights a week, dinner happens to be an elaborate affair, but lunch is always “fix it as fast as you can”. Quick lunches are the need of this day! As I browse through more and more recipes for quick lunch ideas, I realize that a one pot meal or a quick lunch does not have to be lacking in nutrition, in fact it may as well be healthier than your four course meal, depending on the ingredients used. 

So here’s presenting my lunch for today – An Avocado & Jalapeno Sandwich. 
It uses simple ingredients, is healthy enough and takes no time to cook. I devoured it with gulps of fresh lemonade in between since the temperatures have hit a scorching 97 F at noon but feel free to nibble it with anything from your pantry like potato chips, ketchup or both!


Ingredients


  • Ripe Avocado – 1 medium
  • Jalapeno – 1 medium
  • Pepper Jack cheese – 1/2 slice
  • Cream cheese – 2 tsp
  • Lemon juice – 1/2 tsp
  • Olive oil – 1/2 tsp
  • Butter – as needed
  • Salt and Pepper
  • Bun or Bread of your choice. 


Here's How :-

Slice the avocado and jalapeno. You may de-seed the jalapeno if you want the heat out of your sandwich. Heat a flat skillet and grill the sliced avocado and jalapeno using olive oil, salt, pepper and flipping sides as needed. Make sure they have a nice char on them so that they give out a smoky flavor. Put the slices on a plate, sprinkle a few drops of lemon juice. 

Next, apply butter on both sides of the bun and toast it on that same skillet. I decided to use white bun since I had those, but wheat or a multigrain bread substitute would also work great. Once done, spread the cream cheese evenly on the inner portion of each part of the bun. 

Lay one part flat and layer it with avocado, jalapeno and half a slice of pepper jack cheese. Close it with the remaining part of the bun which also had cream cheese on it.  The sandwich is all ready to eat, so dig in!

p.s. – This one’s also a great take along lunch for picnics if you are bored of the peanut butter or grilled cheese routine!


E.N.J.O.Y